Nurturelabs CXP Support

We’re here to help!

Choose
your topic

[pagelist child_of="5355"]
 

The List Cleanup tool lets you delete contacts from your email subscriber list(s). With this tool, you can delete contacts by status (Active, Unconfirmed, Bounced, Unsubscribed) or by their email address. 

In this article:

Take note

  • List cleanup actions are permanent and cannot be undone. We recommend exporting all contacts before using the List Cleanup tool
  • If a contact appears on multiple lists, we’ll only remove their association from the list(s) you select and they will remain in your Nurturelabs CXP account
  • If a contact appears only on the list(s) you select, they will be deleted from your Nurturelabs CXP account entirely. They cannot be restored and this action cannot be undone

Access the List Cleanup tool

1. Export contacts from your account.

2. Click “Contacts” located in the left menu.

3. Click “List Cleanup.”

The List Cleanup page will load:

List cleanup tool page

Delete contacts from a list(s) by status

The “Delete Contacts by Status” option lets you delete contacts with a particular status before a specified date. For example, you can delete contacts with the following statuses for any list, multiple lists, or all lists:

  • Active
  • Unsubscribed
  • Unconfirmed
  • Bounced
  • All
Delete contacts by status

The “Before this Date” field will look for contacts who received the status you selected by that specific date for your list. For example, if you wish to delete contacts who bounced before August 1, 2018 for your list, you would select August 1, 2018 in the “Before this Date” field.

To delete contacts by status:

1. Click the “List” drop-down and click the list you wish to remove contacts from. To select more than one list in this step, press the shift key on your keyboard and click the additional lists in the drop-down.

2. Click the “Status” drop-down and click the status. You can only select one status in this step.

3. Click the “Before this date” field and click a date on the calendar.

4. Click the “Delete From List” button and confirm your action in the modal pop-up.

Remove contacts by status

Delete specific contacts from a list(s) by email address

The “Delete Specific Contacts” option lets you delete specific email addresses from the list(s) you selected. You can use this option if you have certain contacts you wish to delete from a list(s), instead of deleting all contacts with a particular status from a list.

Delete specific contacts

To delete specific contacts:

1. Type each email address you wish to delete in the “Bulk Deletion” box. Use a comma to separate multiple email addresses.

2. Click the “Select a list” drop-down and click the list(s) you wish to delete contacts from.

3. Click the “Delete From List” button and confirm your action.

Additional information

Edit contacts in bulk

Use the Bulk Edit tool to edit multiple contacts at once. For example, you can use this tool to add or remove tags, subscribe and unsubscribe contacts from lists, add contacts to other automations or end an automation, or update their contact field information. 

Remove unengaged contacts from your account

Use the Engagement Management tool to delete contacts who have not engaged with your campaigns or automation emails over a period of time.

Add and remove contacts from your Exclusion List

An Exclusion List is a list of email addresses that are prevented from receiving campaigns and automation emails from you. You can add and remove full or partial email addresses from this list. 

The Bulk Editor allows you to modify multiple contacts at once rather than one contact at a time.

With the Bulk Editor you can:

  • Add and remove tags
  • Subscribe and unsubscribe contacts from lists
  • Add or remove contacts from automations
  • Update fields (Phone, Organization, and any custom fields you’ve created)

You might use the Bulk Editor to tag contacts who visited a product page of your website or add contacts to a follow-up automation after they clicked a certain link in an email campaign you sent so they can receive targeted follow-up. 

How to edit multiple contacts with the Bulk Editor

To learn how to edit multiple contacts with the Bulk Editor, follow these steps:

1. Click “Contacts” located in the left side navigation menu.

2. Click the checkbox next to each contact you wish to edit.

Note: If you wish to edit all contacts, click the “Edit All” button. This will automatically select all contacts.

3. After selecting the contacts you wish to edit, click the “Edit” button.

4. The Bulk Editor tool will open. Under the “Actions” box, click the edit option you wish to work with. You can select more than one action.

5. After selecting an edit option, a dropdown menu with a search bar will appear. You can either search for the item you wish to update, or you can select it from the dropdown list. In this example, we’re going to choose “Add to automation.”

6. Confirm the action by clicking the “Add to…” button.

7. The bulk edit action will appear on the left side of the Bulk Editor. You can add more actions following the steps above if you need to.

8. Click the “Apply Changes” button.

9. A confirmation message will appear. Click “Apply changes to X contacts.”

Any changes made to contacts with the Bulk Editor cannot be cancelled or undone.

10. Another confirmation message will appear letting you know that the selected contacts will be edited. Click “OK” to close the window.

Depending on the number of contacts being edited, it may take a few minutes for the edits to finish processing. You can continue working in your account while this process completes.

Using the Bulk Editor with advanced search:

Advanced search and the Bulk Editor are two tools that you’ll use together often. With advanced search, you are able to find very specific groups of contacts. Once you’ve found the group of contacts you want to modify, simply click “Edit All” to display the bulk editor and apply the desired changes to those contacts.


If you have duplicate contacts in your account, you can use the Merge function to combine them.

Note that it’s not possible to merge more than two contacts at the same time. Once a contact is merged, the action cannot be undone.

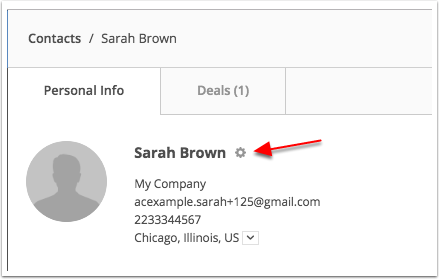
1. From the Contacts Overview page, click the contact record of your Source contact. This is the contact you would like to merge into another contact. By the time the merge is complete, the email address for the Source contact will no longer exist in your account.

2. Click the Gear Icon next to the contact’s name.

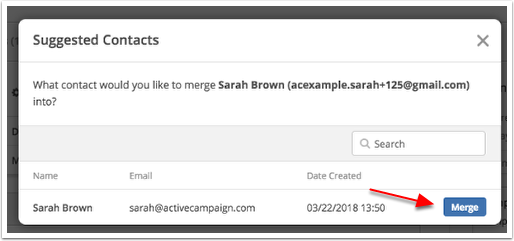
3. Click the “Merge” option that appears.

4. A modal window will appear and suggest other contacts for you to merge the Source contact into. These are called Destination contacts. If the contact you wish to merge into is listed, click the “Merge” button. If the Destination contact of your choice isn’t listed, type their email address in the search bar and click the “Merge” button. 

By the time the merge is complete, the email address for the Destination contact will remain in your account. 

5. Resolve field conflict(s).

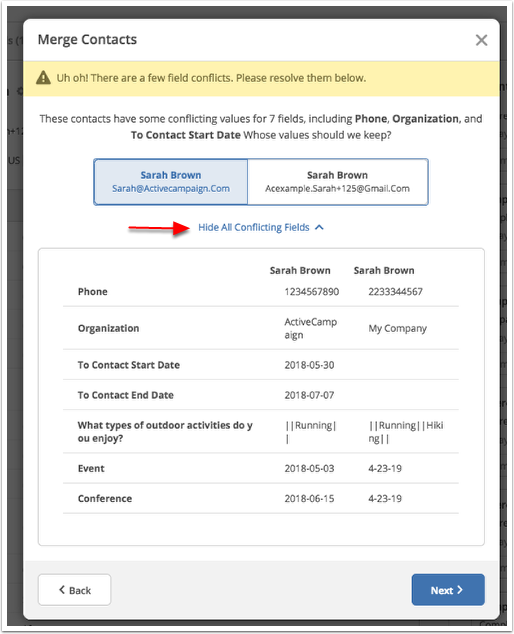
If your two contacts have different values for the same field(s), you will be asked which contact’s field values to keep and which to discard.

To view all conflicting fields for your two contacts, click “View all conflicting fields.” 

The Destination contact will be listed on the left, and the Source contact will be listed on the right.

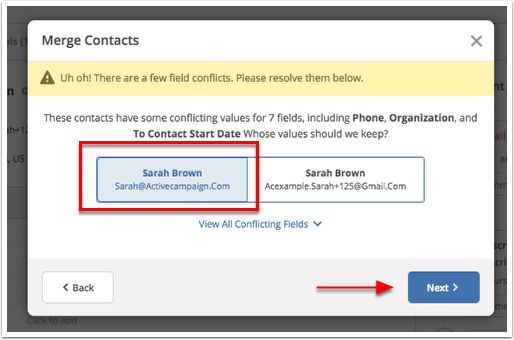
To select the contact’s field(s) you wish to keep, click on that contact’s name then click “Next.” This choice will be applied to all conflicting fields for this merge.

In this example, I am going to choose to keep the field values of my Destination contact. This will discard the field values of the Source contact.

6. Resolve automation conflict(s). 

If these two contacts are in the same automation(s), you will need to choose either the Source Contact’s version of the automation(s) or the destination contact’s version of the automation(s).

To see all conflicting automations, click “View conflicting automations.”

The Destination contact will be listed on the left, and the Source contact will be listed on the right.

To select either version, click on that contact’s name then click “Next.” Your choice will be applied to all of the same automations that both contacts are in. In this example, I selected the source contact’s automation stage:

7. Read and click the checkboxes in the final confirmation modal. Once finished, click “Merge” to complete the merge action.

8. A confirmation message will appear when the merge is complete. Click “Finish” to exit.

Once the merge is complete, the Source contact will be merged into the Destination contact; the contact record for the Source contact will no longer exist. 

Tags from the Source contact will be added to the Destination contact. These tags will be listed in addition to what the destination contact already has listed in their profile.

Open deals assigned to the Source contact only will not be deleted and will not be assigned to the Destination contact. Instead, this open deal will remain unassigned in your account.

If there were other contacts on the deal in addition to the source contact, the deal will still be assigned to those contacts.

Past campaign activity from the Source contact will be added to the Destination contact’s activity feed.