Nurturelabs CXP Support

We’re here to help!

Search

Choose
your topic

[pagelist child_of="5355"]

In this article, you’ll learn about the various contact management features we offer. We’ll also provide examples of when you might use these features and where to find them in your Nurturelabs CXP account.

What is a contact?

A contact is a unique email address. You can create a contact with only an email address (no other information is needed). You cannot create a contact without an email address.

An email address counts as a single contact no matter how many lists the contact is subscribed to. You are only billed for the active contacts in your account (unsubscribed and bounced contacts do not count toward your contact total).

What is the Contacts Overview?

This is the page you see after clicking “Contacts” in the left-side menu. It displays a sortable, searchable list of your contacts.

Most bulk contact management takes place on the Contacts Overview page. From here, you can sort and search your contacts, bulk edit your contacts, do multi-dimensional searches on your contacts, and open up individual contact records.

Clicking a contact’s name or email address will open their Contact Record.

What is a Contact Record?

The Contact Record aggregates and organizes all the information you’ve collected about a contact. From the Contact Record you can edit and add information and a variety of contact management features are available to you. You can subscribe and unsubscribe from lists, start and stop automations, and add and remove tags. From the contact record you can also see a stream of the contact’s recent activity, create tasks, and add notes.

Filter/sort/adjust columns

The contact list that appears on the Contact Overview can be filtered and sorted.

You can filter the contacts by the list they are on, the tags they have, and their status (confirmed, unconfirmed, unsubscribed, or bounced).

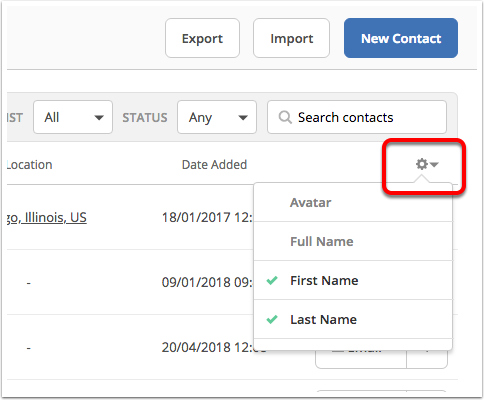
You are able to display additional columns by clicking the gear icon in the upper right-hand corner of the contact list:

Search

You may need to find a single contact so that you can add information to their contact record, remove them from a list, or add them to an automation.

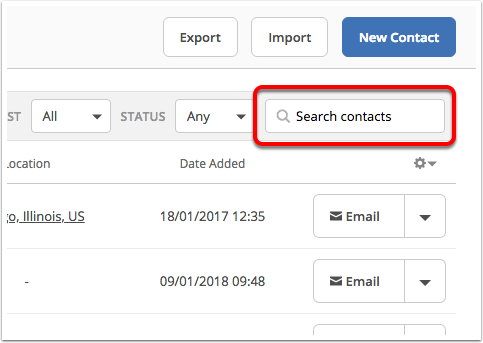
You can search for a single contact by their name or email address. To find a single contact, click into the search field that appears in the upper right-hand corner of the contact list:

Advanced search

You may want to find groups of contacts that match specific conditions. For instance, you may want to see the contacts that have viewed a certain product on your site or all the contacts that live in a certain state of the U.S.

To use the Advanced Search feature, click into the search field located on the Contacts Overview page, then click “Advanced Search.”

The segment builder will load. Here you can select from several different conditions and combine them with AND or OR logic to create your search. For example, you can search for contacts using any of the following conditions:

  • Tags added to contacts.
  • Visits to pages of your website.
  • Clicks on specific links in your campaigns.
  • Contact data including custom fields you’ve created.
  • Contact location.
  • Events you are tracking.
  • Where the contact was referred from.
  • The device they used to visit your site.
  • And more.

After you’ve identified the contacts you are looking for, the Advanced Search can be saved so you can quickly reuse it or the conditions can be used to create a segment of contacts so you can send campaigns to them.

Bulk Editor

The Bulk Editor is a time-saving feature that allows you to manage groups of contacts. You are able to:

  • Add to or unsubscribe from lists
  • Add to or remove from automations
  • Add or remove tags
  • Update fields

After you’ve found a group of contacts with the Advanced Search feature, you can use the Bulk Editor to perform actions on them without having to modify each contact one-by-one.

Manage tags

Tags can be added to your contacts as a way to organize and group them. Tags can also add information to your contact (in addition to the use of default and custom fields).

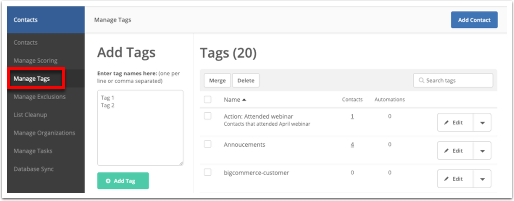
The Manage Tags feature allows you to create and edit your tags. You can merge duplicate tags and also describe a tags purpose (so that you don’t forget why a tag was created or what it indicates).

To access the Tag Manager, click “Manage Tags” from the Contacts Overview page.

Custom Contact Fields

Custom contact fields are used to store additional information about your contacts. The custom fields that make sense for your business may be different than what someone else needs, so we’ve made custom fields very flexible and you can create an unlimited amount of fields.

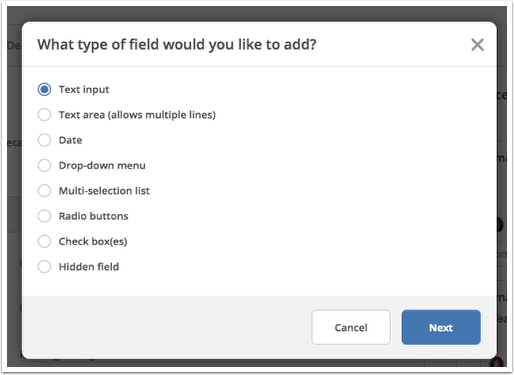
There are a variety of field types you can use to store different types of data:

You can also add these fields from the Contact Record.

Contact Scoring

Contact scoring gives you a numerical score that can indicate the contact’s fit for your product and level of engagement so that you can prioritize your leads and treat them differently depending on their score. It’s a flexible feature that is useful to both marketers and salespeople and has many applications throughout the customer lifecycle.

To manage your contact scores, click “Manage Scoring” from the Contact Overview page.
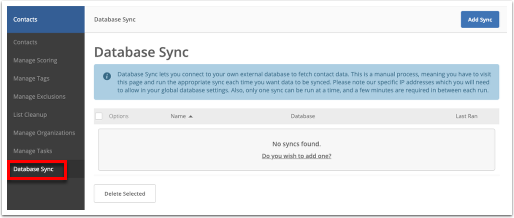
Database Sync

Database Sync allows you to quickly import contacts from a MySQL, MSSQL, or PostGreSQL database.

To access Database Sync to import your contacts, click “Database Sync” from the Contacts Overview page.
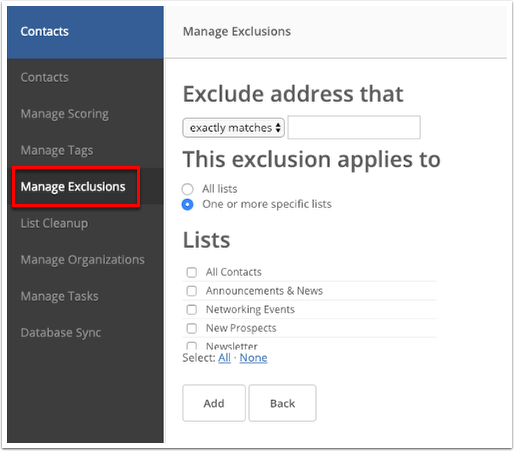
Manage Exclusions

You may not want to send to groups of email addresses. For instance, you might find that you are getting poor quality contacts from certain domain names. With our exclusion feature, you can block those email addresses so that no emails get sent to them.

To access the Exclusions List, click “Manage Exclusions” from the Contacts Overview page.

List Cleanup Tool

The List Cleanup tool helps you delete contacts from your list(s) that you no longer need.

For example, you can use the List Cleanup tool to:

  • Delete all contacts with a particular status from all lists
  • Delete all contacts with a “Subscribed” status from selected lists
  • Delete all contacts with an “Unsubscribed” status from selected lists
  • Delete all contacts with an “Unconfirmed” status from selected lists
  • Delete all contacts with a “Bounced” status from selected lists
  • Delete all contacts with any status from selected lists
  • Delete specific email addresses (contacts) from selected lists

To access the List Cleanup tool, click “List Cleanup” from the Contacts overview page.


Contacts on your list(s) can have one of four statuses: Active, Unconfirmed, Unsubscribed, or Bounced. In this article, we will define each contact status and show you how to filter contacts by their status.

Contact statuses

Active

An active contact is a contact who has confirmed their subscription to your list (if you are using opt-in confirmation) and has not unsubscribed or bounced. Note that an active contact is not the same as an “engaged” contact, which are contacts who open and/or click links contained in your marketing emails. Learn how to track engagement of your active contacts.  

An active contact can opt in through a form, can be added by you manually, through an integration, through the API, etc. For more information on how to add contacts, see the help article on that topic.

Active contacts count toward your contact limit (the number that is used to determine your billing plan). An active contact counts as only one contact regardless of how many lists they are on. A contact will no longer be counted as “Active” if your campaigns bounce or they unsubscribe from your lists.

Unconfirmed

A contact is labeled as unconfirmed if they submit a form that includes an opt-in confirmation email (also known as double opt-in), but have not yet clicked the confirmation link.

Unconfirmed contacts will not be sent campaign emails until they have been moved to “Active” either by clicking the confirmation link or being manually added to a list by an admin user. Note that manually adding unconfirmed contacts to lists violates our terms of use and may upset your contacts resulting in spam complaints. 

Unconfirmed contacts do not count toward your contact limit.

Unsubscribed

A contact is labeled as unsubscribed when they have either manually unsubscribed by clicking an unsubscribe link in an email campaign you’ve sent, or if they have been manually removed from a list by you or an “Unsubscribe” action in an automation.

Contacts that have been unsubscribed from all lists are not counted toward your contact limit. If they are “Active” on at least one list, they will be counted to your contact total. 

Bounced

A contact is labeled as bounced when an email campaign that is sent to them is rejected by their receiving email server. These rejection notices indicate the email address is either invalid or inaccessible.

There are hard bounces and soft bounces:

Hard bounce

This happens when a message is returned with the error that it was permanently rejected. If we receive a hard bounce, the contact is immediately given the status of “Bounced” and we will no longer send to them.

Soft Bounce

This means that the email address may be only temporarily unavailable. If a contact experiences a soft bounce, we will not attempt to resend them the same email unless it’s a type of soft bounce that says “Try again later.” In order for a contact to be given a “Bounced” status, they must receive three soft bounces in a row, for three different campaigns.  

Contacts with a bounced status are not included in campaign sends and do not count toward your contact limit.

Filter contacts by status

You can filter contacts by status on the Contacts Overview page.

Here, you’ll see a row of filters above your list of contacts. Click “Any” next to “Status” to display a menu of contact statuses.

Click the status you are interested in filtering by to display those contacts.

Note that you can combine filters to further narrow your contact list. For instance, you could filter first by the list and then by the contact status to find contacts on that list that are unconfirmed or unsubscribed.

As a reminder, only contacts with an “Active” status for at least one list will count toward your contact limit.


  • Plus
  • Professional
  • Enterprise

A contact score is one of two types of lead scores that you can create in your Nurturelabs CXP account and is used to evaluate and prioritize the quality of your leads. There is not a maximum limit on score values.

In this article, we’ll discuss:

What is a contact score?

A contact score is a numerical value that is assigned to your contacts. A single score can be comprised of one or more rules that can award or subtract points from contacts if they meet your conditions. For example, if you have created a rule that assigns 10 points if a contact is in your metropolitan area and another rule that assigns 10 points if a contact has viewed your pricing information, a contact that matches both rules would have a score of 20 points.

Scores are created on the Manage Scoring page and rules for your scores are created using any information available to you in the segment builder. In addition, these scores can be set to expire after a period of time. There is no limit to the number of scores you can create in your account. 

Scores can run once per contact regardless of how many times they match your rules. This is called Static Scoring. Scores can also run each time a contact matches your rules. This is called Dynamic Scoring and is accomplished with an automation that is set to run multiple times. Contact scores, once created, are retroactive. 

Uses for Contact Scoring

One of the most popular uses of scoring is to optimize your sales process so that your sales team is always focused on the highest quality leads. Scores can also be used to:

  • Identify contacts who are a good match for your product or service, but not engaged, so that you can move them into nurturing automations specifically designed to increase interest and strengthen your relationship. In this way, scoring can be useful as a benchmark for how close a particular contact is to purchasing so that you can adjust your marketing accordingly.
  • Identify the interests of your contacts. You can create rules and automations that give points for visiting product pages of your website and clicking product links in your emails. When they reach a threshold score, you can begin an automation that delivers targeted follow-up with content and offers related to that product.
  • Measure the engagement of new customers. For instance, in the SaaS industry, if new customers aren’t interacting with your emails and website it may be an indication that additional contact is needed so they don’t cancel. If a new customer has a low engagement score you could move them into an automation that provides helpful resources and information intended to help them get more value out of the service and pique their interest in it by reselling the benefits.
  • Create a predictive model. If your scoring system is accurate, you can use the leads in your funnel to forecast revenue.
  • Alter your marketing on the basis of a contact’s score so that you are more aggressive with highly engaged contacts who are a great fit. A contact who is highly engaged is probably ready to make a purchase decision and you may be able to be more aggressive with the frequency you contact them. In this way, you can adapt the length of your sales cycle on the basis of a lead’s behavior.

How to create a contact score

Scores created on this page will run once per contact, regardless of how many times they match your rules. If you want to add or subtract points each time a contact matches your rules, you will need to use an “Adjust a score” action in an automation that is triggered to run multiple times.  Contact scores, once created, are retroactive. 

To create a contact score:

1. Click “Contacts” from the left-side menu.

2. Click the “Manage Scoring” option that appears on the left.

3. Click the “Add New Score” button.

4. A modal window will appear and ask you which type of lead score to create. Click the “Contact score” option.

5. Give your score a descriptive name by typing it in the field provided. You’ll also want to provide a description of the score in the description field.

6. Click the “Add New Rule” link to add a rule to this score.

7. The segment builder will open. Click the left-most field to display a dropdown of categories you can use to create the conditions that distribute points.

For example, you may want to create a rule that gives the contact 10 points if they click on any link in any campaign:

You can add additional conditions to your score by clicking “Add another condition.”

8. Once you have set the conditions, click the “Save” button.

9. You’ll then see a column that says “Add 10 points.” You can click this line of text to modify the number of points you would like distributed.

You can create rules that add or subtract points. You might subtract points if a contact has characteristics that are at odds with your target market. For instance, if there are countries you don’t ship to, you could subtract points when a contact is in those countries.

10. Next you’ll see an expiration option. The “points expire” setting lets you remove the awarded points after a period of time. This is especially useful for engagement scoring because a contact who was highly engaged three years ago may no longer be considered engaged now. When you are scoring characteristics of your target market that are unlikely to change, having points expire “never” is probably fine. 

To set an expiration, click the line of text that says “never.”

11. When you’ve added and configured the rules of your score, click the “Active” button to activate the score. 

Note that the score will need to be active before you can use it for dynamic scoring with automations.

How to adjust repeating point values (dynamic scoring)

Dynamic contact scores are created with automations that are set to run multiple times. Creating a dynamic contact score will allow you to add or subtract points each time a specific behavior occurs. You can also set a contact score to a specific value, or reset the score to 0. You will want to make sure that you already have a contact score rule set up in order to create this automation.

To adjust points each time a behavior occurs you need to create an automation that runs multiple times.

1. Click “Automations” from the left-side menu.

2. Click “New Automation.”

3. Click “Start from scratch” then click “Continue.”

4. A modal window will appear with a variety of triggering conditions to start this automation. Each of these triggers represents a behavior you can use to add points to your score. We will give more examples of triggers you can use to adjust points at the end of this section, but for now, we are going to create a rule that gives 5 points each time a contact opens an email campaign.

To do that, we’ll click the “Opens/reads an email” trigger.

5. You are asked whether this trigger is looking at campaigns you’ve sent or one-to-one emails you’ve sent from the Contact Record or Deal Record. In this example, we are looking at campaigns, so click “When a contact opens a campaign.”

6. Now you can define which email campaign should trigger the automation when it’s opened. In this example, we want to distribute points for every campaign that is opened so we’ll leave it as “Any campaign” in “Any list.”

Change the “Runs” setting to “Multiple Times” by clicking the Runs dropdown and selecting “Multiple Times.” This is an important setting because it is what allows the automation to distribute points over and over each time a campaign is opened.

Click “Add Start.”

7. The “Add new action”modal will appear. Here you can add an action that will adjust the score. Click “Contacts” then click “Adjust score.”

8. In the modal window, use the dropdowns to select the score you wish to adjust, if you want to add, reduce or set a specific value for the contact score when a contact encounters this step in your automation. Next, type the number of points.

Use the “Expires” setting to define when the points should drop off the score. 

If you are scoring on engagement, you might want the points to drop off after a month or two so that the score always indicates your recently engaged contacts.

Click “Save.”

9. Type the name of the automation into the field provided, and click “Active” to turn the automation on.

Additional examples of triggers you can use to adjust a contact score:

  • You can remove points when a contact unsubscribes from a list using the “Unsubscribes” trigger.
  • You can give points each time they open an email campaign using “Open/reads an email.”
  • You can distribute more points when they open a specific, important campaign using the “Opens/reads an email” trigger.
  • You can distribute points each time a web page is visited using the “Web page is visited” trigger.
  • You can add points when an event happens using the “Event is recorded” trigger.
  • You can add points when a contact forwards your email campaign to another person using the “Forwards and email” trigger.
  • You can add points when they submit a form with specific selections using the “Field changes” trigger.
  • You can add points when they click specific links in an email campaign using the “Clicks a link in email” trigger.

Beginning automations based on scores:

You might want automations to begin when contacts reach a certain score. For instance, you could create an automation that automatically creates a deal record, assigns the deal, and creates a task to reach out to the primary contact when a contact reaches a score of 75 points or more. You can do this with the “Score changes” trigger.

1. From the Automations overview page, click “New Automation.”

2. Click the Start from Scratch option, then click “Continue.”

3. Click the “Score Changes” trigger, then click “Continue.”

4. Using the dropdowns, select which score should trigger the automation and set whether the automation should run once or multiple times. Then click “Add start.”

 
One-to-one emails, or personal emails, are one-off messages that you can send to contacts from the Contact Overview page or a contact profile page. If you are on a Plus, Professional, or Enterprise plan, you can also send a one-to-one email to a contact from their deal record. 

In this article, you’ll learn how to create and send a one-to-one email to a contact from the Contacts Overview page and a contact profile page.

 If you connected your email account to the Deals CRM, you can use automation to send one-to-one emails to your leads and contacts. 

1. Click “Contacts.”

2. Click the “Email” button next to the contact you wish to send a one-to-one email to.

3. The message composer will open. Type a subject line and your message into the fields provided. Note the bold, italics, and strikethrough styling options on the lower left of the composer. To add bullet points, insert a link, or switch from html to a plain text email, click the more options icon.

4. If you want to use a template for this message, click the “Saved Responses” icon and select which Saved Response you want to use for this email. 

5. You can insert a personalization tag in order to add values from the contact record into your message. To do so, type the percentage symbol (%) into the body of the message. You’ll be presented with a menu of fields you can insert. After selecting the field, you’ll see a blue placeholder with an inserted value.

If you are using personalization tags in your message, they will appear as blue and will populate with values from the contact record. If any of the personalization tags appear in red, then this means the contact does not have a value for that field. If you try to send a personal email with a tag highlighted in red, you will be asked to add a value for that field before sending your message.

5. To add a contact to an automation when you send the email, or when a contact replies to your email, click the “Automate this email” icon (1) located next to Saved Responses. Choose the automation (2) you wish to add your contact to and select if you want them added (3) when the email is sent or when they reply. Click “Save” (4).

6. Clicking the “From/To Details” will show you the From email address and To email address. The From email address will be the email address associated with the account user and cannot be changed.

7. Once you have finished creating your email, click “Send.”

Note: You can also select a contact from the Contacts Overview page and then click “Send Email” in the Compose bar located at the bottom of the Contact Profile page.

Keeping your contact list well-organized will save you time and make it easier for you to leverage all of Nurturelabs CXP’s features to create the best marketing and sales processes possible.


Putting some thought into how you want to organize your contacts will help you create the best structure from the beginning so you don’t have to invest time into re-organizing your list later when it becomes a problem. This article will cover some of your options and give you some things to think about as you decide on how you’ll manage your contacts.

Remember, there isn’t a one size fits all solution and no one approach is objectively better than any other. As long as your contact list feels organized to you and makes sense to you, you are doing it right. 

List-based organization

Organizing your contacts into separate lists is a logical way to organize them. However, some companies find that they end up creating so many lists for different reasons that list-based organization becomes confusing and unmanageable.

But, if you’re confident that you can organize all your contacts into a handful of lists, this is a good, straightforward option. You won’t be penalized for having a contact on more than one list (one email address counts as one contact no matter how many lists that contact is on). 

Tag-based organization

Tags are a fast, flexible way to indicate the status of a contact or indicate they are part of a group. You can think of tagging like placing a contact into multiple folders.

Some people prefer to have only one list of contacts and then use tags to create groups of contacts.

We make it easy to filter your contacts by tag, and it is easy to create segments of contacts with tags, so tags are a good alternative to list-based organization.

Note that to send to subgroups of contacts when you are using tag-based organization, you’ll always have to send to a segment so you’ll probably create a variety of segments. In that case, you’ll want to carefully name your segments so it’s always clear what group of contacts is included in that segment. 

“List & tag hybrid” organization

Some companies find it useful to use lists to give a high-level structure to their contacts and then use tags to subdivide their lists into more specific groups.

For instance, you could have a “Prospects,” “Partners,” and “Customers” list and then use tags to break each list into smaller chunks. You might tag your prospects with their product interest, your partners with the relationship you have with them, and tag your customers with the product they ordered from you, for example. 

Custom fields

You can also use custom fields to organize your contacts by gathering important data and then using that data to create segments. For instance, you may have a custom field that indicates which of your products they are interested in. You could put that custom field on a form so that people send you that information when they opt-in. You could create a segment out of each of the three choices and then send targeted campaigns to each segment.

Creating list segments

No matter how you choose to organize your contacts, you’ll want to create segments so that you can send email campaigns to subgroups of your lists. This way you can send to only the contacts who would be interested in that particular message. Sending very targeted email campaigns has a variety of benefits. When your contacts only receive messages that are very relevant to them, they’ll be more likely to pay attention to your campaigns. This will create a positive feedback loop where your campaigns are opened more, receive more clicks, this may help your deliverability, will certainly strengthen your relationship with your contacts, and will likely result in more sales.


How to sort contacts

Sort contacts on the Contacts Overview page by Full Name, First Name, Last Name, Email Address, Account Name, Date Created, Contact Scores, and Deal Scores.

To sort contacts on a list:

1. Click “Contacts” to navigate to the Contacts Overview page.

2. Click any of the following default column headers to sort your contacts: Full Name, Email Address, Account Name, and Date Created.

3. If you want to sort contacts by other data points, such as First Name, Last Name, Contact Score, or Deal Score:

  • Click the Gear in the column header row
  • Click the option you want to display on the Contacts Overview page
  • Click the column header for the newly added option to sort your contacts
Additional sort options

The Contacts Overview page will list contacts in order by the sort criteria you set.

It is not possible to sort contacts by Custom Fields, Tags, Social, Job Title, or Phone.

How to filter contacts

In addition to sorting options, you can filter contacts on the Contacts Overview page. The filter options available are Tags, List, and Status (list status).

Filter NameFilter Options
TagsAll, Any, None, Specific tags you create
ListAll, Any, None, Specific lists you create
StatusAny, Active, Unconfirmed, Unsubscribed, Bounced

Use each filter option on its own or in combination with the other filter and sorting options available to you.

Note that you can only use one condition in each filter option.

To filter contacts on the Contacts Overview page:

1. Click “Contacts” to navigate to the Contacts Overview page.

2. Click the dropdown option you wish to use to filter contacts.

Contacts Filter Options

3. Click the desired option in the filter dropdown.

The Contacts Overview page will list all contacts who meet the criteria set in your filter.


Social Data, or ERJA, is a premium service that you can use to gather more information on your subscribers. You can use this data to create targeted campaigns and more personalized marketing automations. The information is collected from multiple third-party data sources and is funneled into your account. Only information that is public or user-supplied will be added.

ERJA data includes:

  • Age
  • Gender
  • Name
  • Company
  • Title
  • Social media profiles

ERJA is available for free for Enterprise plans and can be purchased as an add-on for Lite, Plus, and Professional plans.

To add ERJA data to your account:

Click the “Apps” option located in the left side menu.

Next, you can either scroll down the Apps page until you see “ERJA” or you can type ERJA into the search field on the top right corner of the page.

Next, click ERJA to open the ERJA page and click the “Set this up” button.

On the next page, select whether you’d like Basic info, Social info, or both by clicking the appropriate checkboxes.


Click the Save Changes button.

If you are purchasing this as an add-on feature, the pricing information displayed is for your existing contact list and will go up slightly as you add contacts.

Once the service is added, data can initially take 24-48 hours to appear for your existing contacts. If there are contacts we are unable to locate data points for, we’ll keep looking until we find it. Over time, your social data will grow and become more robust.

If social data exists for your contact, we will display the fields on the contact profile page and they cannot be modified.

Using ERJA data in campaigns and automations

Information collected from ERJA can be used by the segment builder to do the following:

  • Add conditional content to your campaigns
  • Create Goal conditions
  • Set up “If/Else” conditions to create forks in your automations
  • Send targeted campaigns by creating a list segment
  • And more

For example, you could create a segment of women over the age of 40 with Twitter profiles, increase a lead score by 10 points if a contact has a LinkedIn profile, or send men and women down different paths of an automation.

This information can be seen under the “Info” section for your contacts and will also appear under “Personal Data” in the segmenting tool.

Why are some of my contacts showing social media information when I did not purchase ERJA?

If your contacts have accounts with Facebook, LinkedIn, Twitter, etc, we will show that information on their contact profile page only. However, unless you have purchased ERJA, this information cannot be used by the segment builder to create segments, automation actions, conditional content, etc.

Did you know?

ERJA is a word derived from the latin word erga (prep. with acc, towards, esp. of personal relations; more generally, about).